
A tidy, accurate tile setup is much easier than you may believe. With preparation and our detailed suggestions, you can do it on your own.
Step 1: Prepare the Surface area
Make certain your surfaces are clean, smooth, and dry for the finest outcomes. Require time to fix, spot, and level any harmed or unequal locations. Check to make certain the surface is structurally sound and the area without wax, soap scum, and grease.
Get rid of any moldings, trim, or devices that may interfere with tile application and inspect the doorjambs to ensure the tile has clearance when setting up underneath. Identifying those possible problems beforehand will assist your setup run smoothly.
Step 2: Begin Your Design
For an efficient design, start by marking the center point of each of the walls in the space. Next, snap chalk lines in between the center points of opposite walls to identify the center of the room. Make any essential adjustments to ensure that the crossway creates the best squares.
Beginning at the center point, lay a row of loose tiles along the center lines in both instructions, utilizing tile spacers as you opt for even, uniform joints. As soon as you reach the walls, you’ll need to cut tiles for an appropriate fit. If the cuts required are smaller sized than half of a tile, you can adjust the centerline by snapping a new line a half-tile size more detailed to the wall. If needed, repeat this step along the converging center line for an accurate design.
To make a large room more workable, divide each section into smaller sized 2′ x 3′ grids by snapping extra lines parallel to the centerlines.
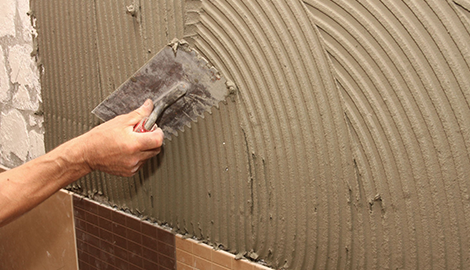
Action 3: Apply the Adhesive
As a general rule, be conscious to mix just enough of the adhesive to be used within 30 minutes. Utilizing the flat side of the trowel type suggested on the adhesive bundle spread a 1/4″ coat on the surface of one grid area without covering the guidelines.
After doing so, hold the trowel at a 45-degree angle and utilize the notched side to comb adhesive into standing ridges. When you get rid of the excess adhesive, you leave a uniform, ridged setting bed for your tile. As another rule of thumb, do not spread out a larger location of your adhesive that can be embedded in 15 minutes.
Stick to the script and facilitate your tile set up with the ideal adhesive application.
Step 4: Cut Tile as Needed
Start by marking thoroughly measured cuts-to-be with a pencil or felt-tip pen on the tile surface area. You can utilize a tile cutter to accomplish determine straight or diagonal cuts. Make skillful curved cuts with a nipper, breaking away little pieces for finest results.
For any full-length curved cuts, a rod saw is most correctly matched to deal with the job. After your cuts are made, smooth out any sharp edges with a carborundum stone to offer a soft finish to your tile.
Step 5: Set Your Tile
Now that you have actually primed the surface, developed the layout, applied the adhesive, and cut the tile, you are totally gotten ready for the actual installation of your tile.
Begin by installing tiles in the center of the room, one grid at a time, finishing each grid prior to proceeding to the next. Within each grid, it will help to start the very first tile in the corner and work outside.
Using a slight twisting movement, set tiles one at a time and prevent sliding them into place. Make certain to either insert spacers as each tile is set or leave equivalent joints between tiles. Conserve the perimeter tiles in each grid for last, leaving a 1/4th inch gap between the tile and wall.
Once a grid is completely set up, tap in all tiles with a rubber mallet or hammer and wood block to ensure a strong bond and level plane. Eliminate excess adhesive from joints with a putty knife and from tile with a wet sponge to prevent an irregular look.
Finally, allow your hard work at least 24 hr to set before strolling on it. And of course, take at least 20 minutes to admire the time and care you have actually put into your new floor!
Action 6: Grouting Joints
Now that your Mohawk Ceramic Tile is in location and has had 24 hours to set, your last step is to “grout” or fill the joints and combine your flooring into one mass.
After carefully checking out and following all directions and precautions on the grouting plan, make just enough to use in a 30-minute duration. As you get rid of the tile spacers and spread grout on the tile surface area, utilize a rubber grout float or a squeegee to force it down into the joints.
Tilt the float at a 45-degree angle and with the edge of the float, remove the excess grout from the surface area right away. Now tilt the float at a 90-degree angle and scrape it diagonally across the tiles.
As soon as you’ve let the grout set slightly for around 15 to 20 minutes, utilize a wet sponge to clean up any residue from the surface area and smooth the grout joints.
Make sure to wash your sponge regularly and alter the water when required.
Polish with a soft cloth when the grout has dried and haze forms on the tile surface, and rinse once again with sponge and tidy water if necessary. Give your recently grouted floor 72 hours before any heavy use and a minimum of 3 weeks prior to applying sealants or polishes.